Alloyで簡易のスライドメニューを実現する方法
前回書いたエントリが意外と注目を集めたので、続編というわけではないのですが、Alloyで簡易のスライドメニューを実現する方法についてまとめておこうと思います。
- 目次
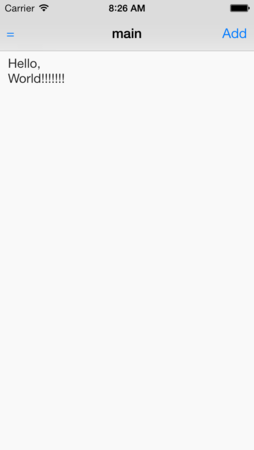
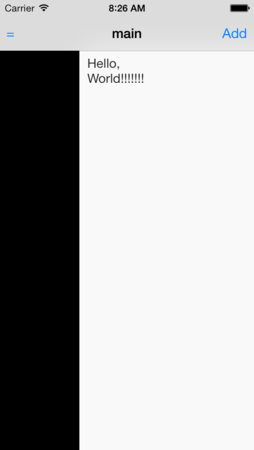
これから作るアプリのイメージ
起動時の画面には、Hello Worldの文字が表示されており、ナビバー上の左上、右上それぞれにボタンが配置されてます。

左上のナビボタンをタッチすると、ウィンドウが右側にスライドするというよくあるユーザインタフェースのアプリをイメージしてます

ソースコード
上記実現するソースコードを以下しめします
index.jade
Alloy
  TabGroup
    Tab#tabOne
      Window#mainWindow.container(title="main")
        RightNavButton#add(platform="ios")
          Button(title="Add")
        LeftNavButton#showBtn(platform="ios")
          Button(title="=" , onClick="slide")

        Label#label Hello, World!!!!!!!
index.coffee
$.index.open()
slide = (e) ->
  if $.mainWindow.slideState is false
    leftPosition = 100
    $.mainWindow.slideState = true
  else
    leftPosition = 0
    $.mainWindow.slideState = false

  transform = Titanium.UI.create2DMatrix()
  animation = Titanium.UI.createAnimation()
  animation.left = leftPosition
  animation.transform = transform
  animation.duration = 500

  $.mainWindow.animate(animation)
index.tss
".container": {
    backgroundColor:"#f9f9f9"
},

"#mainWindow":{
    statusBarStyle:0,
    tabBarHidden:true,
    slideState:false
}
"#label":{
    color:"#222",
    width:80,
    height:40,
    top:5,
    left:10,
    font:{
        fontSize: 16
    }
}
ソースコードの解説
キモは2点かと思います
- Ti.UI.Windowにスライド状態かどうかを判定する独自のプロパティを設定するために、index.tss にslideStateを設定。デフォルト値をfalseで、スライドしてない状態を意図しています
- Controllerのindex.coffeeのslide()は上記のslideStateの値をチェックしてfalseの場合には一定の箇所までスライドするアニメーションを実施します
地味にハマったこと
Alloy → TabGroup → Tab → Window → RightNavButton(もしくはLeftNavButton)という階層構造になってないといけないのが最初よくわからず地味にハマりました。
NabButtonのデフォルトの青色から変更したい場合のやり方。index.tssで設定したいTi.UI.WindowにnavTintColorというプロパティがあるのでそこで任意の色を指定すればOK
"#mainWindow":{
    navTintColor:'#99cc66',
    statusBarStyle:0,
    tabBarHidden:true,
    slideState:false
}
参考までににAlloyのTabGroupでの画面遷移方法
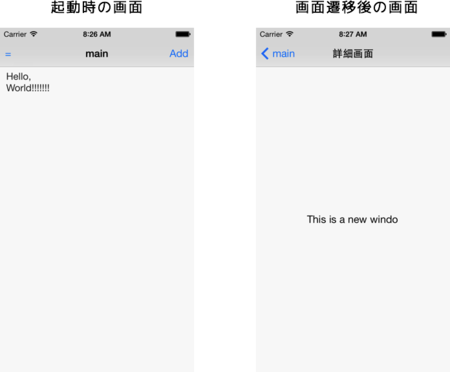
こういう↓感じでナビバーを配置しつつメイン画面から詳細画面へ画面遷移出来るユーザインタフェースのあるスマフォアプリを作るケースは、Titaniumに限らずよくあるかと思います。

折角なので、TabにWindowを配置してあるようなアプリでのメイン画面→詳細画面への遷移の方法についてもまとめておきます
実装する上でのポイント
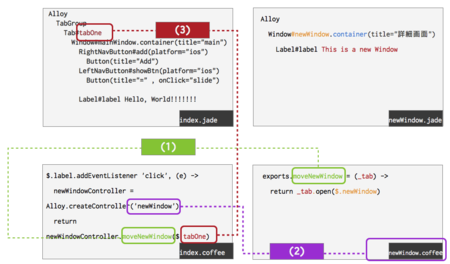
実装する上でのポイントはいくつかあると思うのですが、言葉にすると長くなるのでViewsとControllerとの対応関係を絵にしつつ説明します

- 遷移先のControllerにて実装してるmoveNewWindow()を実行します。moveNewWindowでは、引数にTi.UI.Tabオブジェクトが渡されており、_tab.open(該当のWindow)にて遷移先のウィンドウが開きます。
- 画面遷移先の処理を渡すためにAlloy.createController()を実行してます。引数には遷移先のControllerのファイル名の拡張子をとったものを指定します
- Viewにあたるindex.jadeのTabに任意のID名を付与します。こうすることでController側のindex.coffeeから該当タブをこのようにして取得して、メソッドの引数に設定できます。
最終的なソースコード
index.jade
Alloy
  TabGroup
    Tab#tabOne
      Window#mainWindow.container(title="main")
        RightNavButton#add(platform="ios")
          Button(title="Add")
        LeftNavButton#showBtn(platform="ios")
          Button(title="=" , onClick="slide")

        Label#label Hello, World!!!!!!!
index.coffee
$.index.open()
slide = (e) ->
  if $.mainWindow.slideState is false
    leftPosition = 100
    $.mainWindow.slideState = true
  else
    leftPosition = 0
    $.mainWindow.slideState = false

  transform = Titanium.UI.create2DMatrix()
  animation = Titanium.UI.createAnimation()
  animation.left = leftPosition
  animation.transform = transform
  animation.duration = 500

  $.mainWindow.animate(animation)
$.label.addEventListener 'click', (e) ->
  newWindowController = Alloy.createController('newWindow')
  return newWindowController.moveNewWindow($.tabOne)
index.tss
".container": {
    backgroundColor:"#f9f9f9"
},

"#mainWindow":{
    statusBarStyle:0,
    tabBarHidden:true,
    slideState:false
}
"#label":{
    color:"#222",
    width:80,
    height:40,
    top:5,
    left:10,
    font:{
        fontSize: 16
    }
}
newWindow.jade
Alloy
  Window#newWindow.container(title="詳細画面")
    Label#label This is a new window
newWindow.coffee
exports.moveNewWindow = (_tab) ->
  Ti.API.info _tab
  Ti.API.info $.newWindow
  return _tab.open($.newWindow)
newWindow.tss
".container": {
    backgroundColor:"#f9f9f9"
},

"#newWindow":{
    statusBarStyle:0,
    tabBarHidden:true,
    slideState:false
}
"#title":{
    color:"#222",
    width:Ti.UI.FULL,
    height:40,
    top:"30%",
    left:"50%",
    font:{
        fontSize: 16
    }
}
最後に
今回作ったようなスライドメニューのAlloyWidgetはgitTioでも見つかるのですが、Widgetの実装見てるとそんなに大したことやってないように見えたので勉強がてら自分で作ってみました。
ブログに書くことで大分Alloyのことが理解できるようになってきた気がしてきたのでAlloyのメリットを活かすために
- Widgetの作成方法
- CommonJSな独自ライブラリの利用方法(app/lib/something.jsという感じにすれば利用できるのがわかってる)
- 今のところ手付かずのModelの作成
あたりをこれから勉強していこうと思ってます